Making a Video
In this day and age, there is a variety of ways in which we can create video resources. Many of us have access to devices which can capture higher quality vision and audio, ranging from mobile phones and tablets, to action cameras (like the GoPro range) and affordable, professional consumer (or 'Prosumer') video cameras. All of these devices give us possibilities to generate video footage which we can incorporate in our teaching, but capturing video sometimes requires more thought than just pressing the 'record' button.
Plan
Before you start recording, it's always a good idea to stop and think about what you will record and why you will record it. Ask yourself the question "will this video resource I'm about to create add value to my teaching?". If the answer is "yes", then video can be a powerful addition to your teaching resources. If you're unsure, think about how video will complement your teaching materials and add value to your unit.
There's no real need to be too detailed about your plan. Sketching out basic ideas and a logical progression can help immensely. One interesting approach to screen recording is to record your screen actions and then script a voice-over based on what you have recorded. Even though it is a two step process, you can create a script without 'umms' and 'ahhs', record your voice-over separately and then synchronise it back to your screen recording.
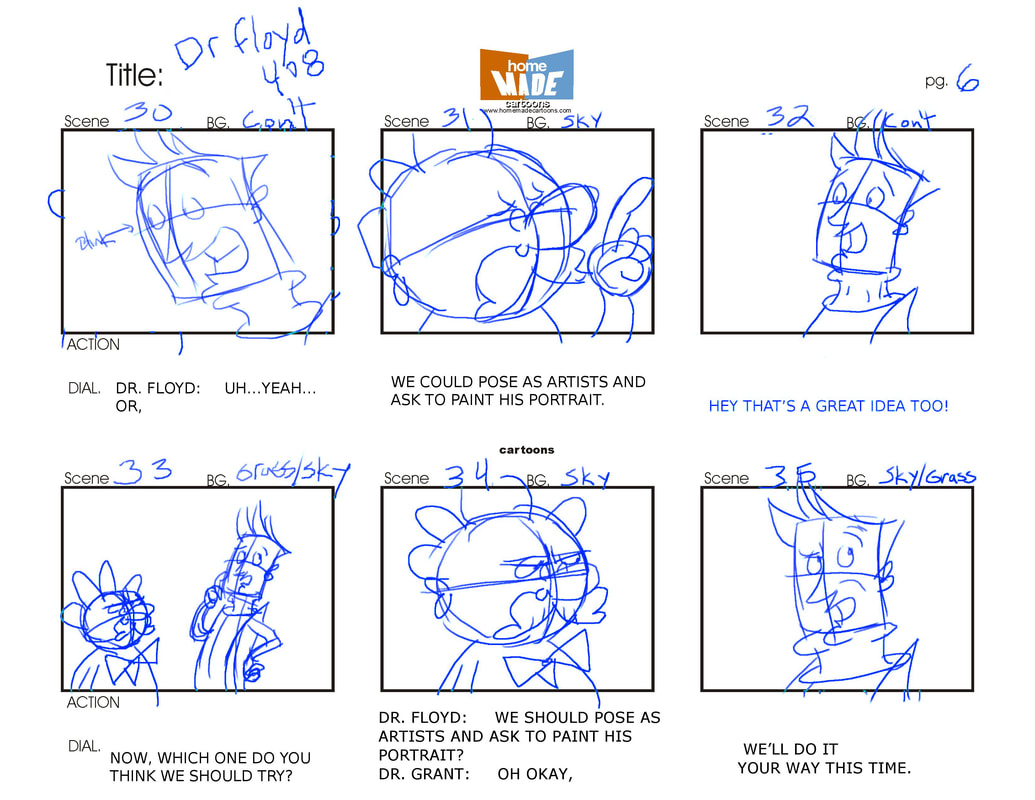
Storyboards can also be used to plan your recordings. This technique has been around for many years and involves rough sketches of each 'scene' of your video. This is particularly useful for larger video projects where you want to have lots of different camera angles, cut-away scenes, extra graphics, etc. Here's a sample image of a storyboard:
There's no real need to be too detailed about your plan. Sketching out basic ideas and a logical progression can help immensely. One interesting approach to screen recording is to record your screen actions and then script a voice-over based on what you have recorded. Even though it is a two step process, you can create a script without 'umms' and 'ahhs', record your voice-over separately and then synchronise it back to your screen recording.
Storyboards can also be used to plan your recordings. This technique has been around for many years and involves rough sketches of each 'scene' of your video. This is particularly useful for larger video projects where you want to have lots of different camera angles, cut-away scenes, extra graphics, etc. Here's a sample image of a storyboard:
At the end of the day, there are many different approaches to planning but the basic mantra is the same - planning can make a substantial difference to the time taken to create your video resource and its final quality.
Lights, Camera, Action!
So, now that the planning stage is done, you're ready for the next step in the process: recording. There are some basic techniques you should keep in mind when recording video. Here are a few things to keep in mind when, say, you're recording a talking head video at your desk:
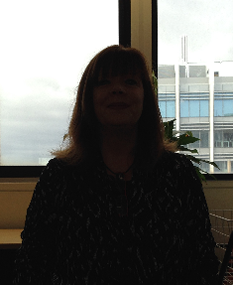
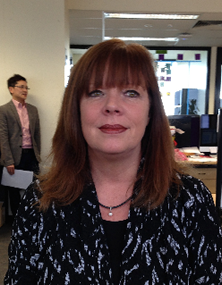
Brighter is better! Always try to have plenty of light in the room. Even though video recording devices are getting better at recording in low light, it's always best to give the cameras a brighter image to record. Also, make sure that if you're recording in a room where you have a strong light behind you, try, if possible to move so that the light is facing you (and behind the camera). If this isn't possible, try covering the window or light source with a curtain and then turn on the room lights. Darker rooms can lead to 'grainier' recordings with washed out colours so the brighter the room, the better the final image. Have a look at the sample images below to see the difference lighting conditions can make to your final recording (hover over each image for more information).
Brighter is better! Always try to have plenty of light in the room. Even though video recording devices are getting better at recording in low light, it's always best to give the cameras a brighter image to record. Also, make sure that if you're recording in a room where you have a strong light behind you, try, if possible to move so that the light is facing you (and behind the camera). If this isn't possible, try covering the window or light source with a curtain and then turn on the room lights. Darker rooms can lead to 'grainier' recordings with washed out colours so the brighter the room, the better the final image. Have a look at the sample images below to see the difference lighting conditions can make to your final recording (hover over each image for more information).
Sound is important. There's nothing worse than having a high quality video image with really poor quality sound. It's distracting and disengaging and renders all your hard work useless. Where possible, pick a room that's quiet and free of distractions (home or mobile phones are set to silent, no television noise in the background, etc.). Most modern laptops will have microphones built-in and these are great at picking up the sound in a room but you may need to be physically far away from them to video record your face.
As a result, the quality of sound may be a little 'distant' and not very clear. An easy way to remedy this is to use a headset/microphone. This moves the microphone closer to your mouth and ensures that room noise is minimised. You can also try a wireless microphone (a headset type or lapel mounted). These are particularly useful when you plan to move around a lot, but do bear in mind that they may be a little expensive. Listen to the recorded samples below to hear the difference between an inbuilt microphone and a USB headset microphone. Have a look at Audio & Microphones page of this site for some suggestions on appropriate microphones. It is important to use the best quality microphone that you can afford and work in as quiet a room as possible.
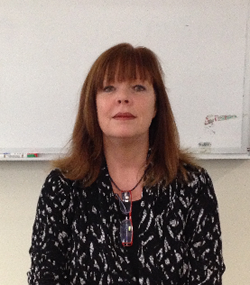
Watch the lens! It is important to make eye contact with your intended audience. Where possible, look directly into the lens rather than at your image on screen (if you're using a webcam) - that way, you give the appearance of looking at the viewer (see the images below). Try to be as natural as possible - make sure you blink, move around a little and vary your speech so that you don't come across as a robot on screen. Making mistakes is perfectly fine but be aware of "umms" and "ahhhs" - they can be distracting and potentially lead to a loss of engagement (hover over each image to see more information).
As a result, the quality of sound may be a little 'distant' and not very clear. An easy way to remedy this is to use a headset/microphone. This moves the microphone closer to your mouth and ensures that room noise is minimised. You can also try a wireless microphone (a headset type or lapel mounted). These are particularly useful when you plan to move around a lot, but do bear in mind that they may be a little expensive. Listen to the recorded samples below to hear the difference between an inbuilt microphone and a USB headset microphone. Have a look at Audio & Microphones page of this site for some suggestions on appropriate microphones. It is important to use the best quality microphone that you can afford and work in as quiet a room as possible.
Watch the lens! It is important to make eye contact with your intended audience. Where possible, look directly into the lens rather than at your image on screen (if you're using a webcam) - that way, you give the appearance of looking at the viewer (see the images below). Try to be as natural as possible - make sure you blink, move around a little and vary your speech so that you don't come across as a robot on screen. Making mistakes is perfectly fine but be aware of "umms" and "ahhhs" - they can be distracting and potentially lead to a loss of engagement (hover over each image to see more information).


Position your camera accordingly. It is really important to make sure that the camera is positioned at the right height so that you're not hunched or sitting in an awkward way. This may require you to raise your laptop using a stand, or if you have a desktop computer with a webcam, reposition it to the appropriate height. If you have a camcorder, the use of a tripod will make life a lot easier. Remember, make sure that the light source lighting you (or your subject) is behind the camera, otherwise the camera will most likely make you (or your subject) very dark and the background will be well exposed. Also, consider the environment in which you'll be recording - are there too many distracting items in the room (busy bookshelves, brightly coloured items, etc.)? If so, you may want to 'tone down' the room a little so that the focus stays on you (or your subject).
Dress appropriately. This may be quite obvious but what you wear can potentially affect the viewer of your final video. 'Loud' clothes can sometimes be distracting (unless that is your intention). Overly casual attire can potentially give the appearance that you don't care about your subject material or, for that matter, your viewer. Again, the point here is to be aware of your attire and how it may affect your viewers.
Hit the record button! Now that everything is setup and ready to go, you can start recording. Remember, be natural - pretend you're in a classroom and be as engaging as you can. Watch your pace - too fast can be a challenge for your viewers and too slow can potentially disengage. Remember to blink, look at the lens as often as you can and ultimately, enjoy the process as this will come across in your recording.
Editing Your Work
Now that you have recorded yourself (or your subject), it's time to edit. In some cases, you may not need to do this. This may be particularly true where you're recording something simple, like a quick 'talking head' style introductory video or a short screen capture. Generally speaking, you may need to do some simple edits to clean up beginnings and endings of your work. Of course, depending on the software you plan to use, this can either be easy or a little more involved.
If you are using Echo Universal Capture software on your PC or Mac, refer to the "How to Use Echo360 Universal Capture for Lecture Recording" document for more information about how to install, setup, record, edit and publish your recording. If you plan to create a more sophisticated video with lots of effects, sound, transitions and more, you will need to use a more robust and sophisticated editing package.
Always remember to save your work as you go. There's nothing more frustrating than working on a project for many hours and then something goes wrong and you've lost all your hard work. Finally, when you plan to output your file for the world to see, make sure you select an appropriate file format.
